
In my previous article, I described how Coolify structured my VPS deployments. Today, we’re pushing the idea further: can we turn any machine — a laptop, a desktop PC, or a VPS — into a hosting platform accessible from anywhere on the Internet?
The answer is yes. And the Coolify + Cloudflare Tunnel combination is what makes it possible, even in notoriously tricky network setups.
The Hidden Trap: CGNAT
Before we start, there’s a point that most self-hosting guides quietly skip over: CGNAT (Carrier-Grade NAT).
Many ISPs share a single public IP address across multiple subscribers. In practice, even with a perfectly configured port forwarding rule on your router, your services remain unreachable from the outside world.
How to check if you’re affected?
- In your router settings, note the IP shown in the WAN / Internet section.
- Compare it with the public IP visible on a site like whatsmyip.org.
- If the two addresses differ, you’re behind CGNAT.
Typical CGNAT range:
100.64.0.0→100.127.255.255
No need to panic — Cloudflare Tunnels are specifically designed to work around this limitation. And Coolify brings the interface and orchestration that turns the whole thing into a proper deployment platform.
The Stack: Your Own Vercel, at Home or on a VPS
The goal: pair Coolify (app management and deployment) with Cloudflare Tunnel (secure internet exposure without port forwarding). The result: a self-hosted alternative to Vercel, Netlify, or Heroku — on your own hardware.

Step 1 — Install Coolify
Installation is a single command, whether you’re working locally or on a remote VPS:
curl -fsSL https://cdn.coollabs.io/coolify/install.sh | sudo bash
This script also handles Docker Engine installation if it’s not already present.
If you’re working on your local PC, run this command directly in your terminal.
If you’re using a VPS, SSH in first:
ssh user@<vps-ip>
then run the install command.
Once installation is complete, open your browser:
- Local machine → http://localhost:8000
- VPS →
http://<your-public-ip>:8000
Create your admin account. You now have a dashboard capable of deploying Node.js, Next.js, Python, WordPress, or any database directly from your own infrastructure.
Step 2 — Deploy a Demo Project
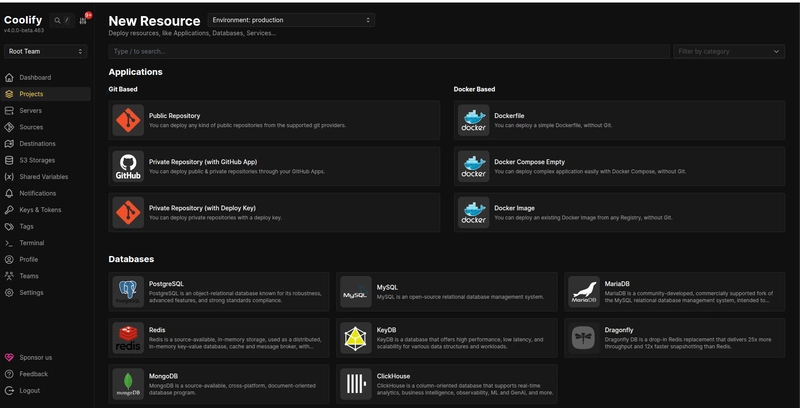
To validate the setup, let’s deploy a project from a public GitHub repository.
- In Coolify, select “Public Repository”.
- Paste the repository URL. For this demo: https://github.com/sony-level/Portfolio_Website
- Select Docker as the Build Pack, then click Continue.
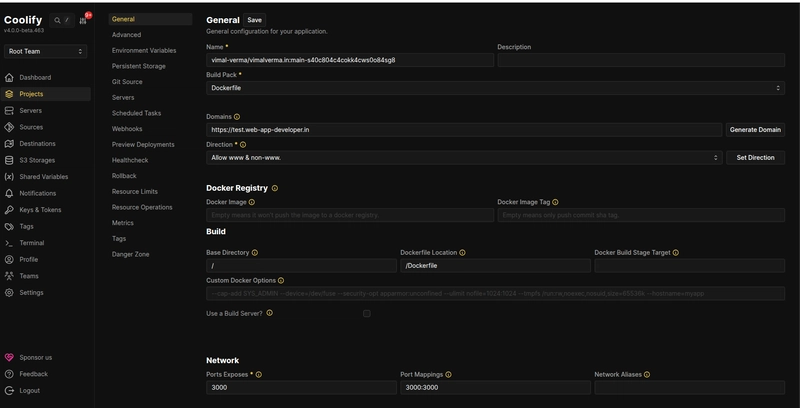
Before clicking Deploy, check the Network section — this is essential for linking a custom domain later:
| Field | Value |
|---|---|
| Exposed Ports | 3000 |
| Port Mappings | 3000:3000 |
Click Deploy. Once the build completes, Coolify generates a URL in the format:
http://xo0gcogkks04ks4sgkk84oww.<your-ip>.sslip.io
Is this link accessible?
- Yes (VPS or ISP without CGNAT) → your Vercel alternative is live. Congratulations.
- No (CGNAT or local machine) → move on to step 3.
In the meantime, your app is still reachable locally. If Coolify runs on
http://10.0.0.1:8000/, your app responds athttp://10.0.0.1:3000/.
Custom domain without CGNAT
To attach your own domain:
- Add a DNS A record pointing to your public IP.
- In Coolify, update the Domain field for your application.
- Save and redeploy.
Step 3 — Bypass CGNAT with Cloudflare Tunnel
If your public URL remains unreachable, here’s how to expose your services cleanly and securely.
3.1 Install cloudflared
Download and install cloudflared from the official Cloudflare documentation.
3.2 Authenticate your machine
cloudflared tunnel login
A browser window opens to authorize access to your Cloudflare account.
3.3 Create a tunnel
cloudflared tunnel create <TUNNEL_NAME>
This command returns a UUID. Keep it safe — you’ll need it in the following steps.
3.4 Configuration file
In the ~/.cloudflared/ directory, create a config.yml file:
url: http://localhost:8000
tunnel: <YOUR-UUID>
credentials-file: /root/.cloudflared/<YOUR-UUID>.json
3.5 Route a subdomain
Make sure your main domain is already managed in Cloudflare, then:
cloudflared tunnel route dns <UUID-or-NAME> <subdomain.example.com>
3.6 Start the tunnel
cloudflared tunnel run <UUID-or-NAME>
If you manage multiple tunnels, specify the config path:
cloudflared tunnel --config /path/to/config.yml run <NAME>
3.7 Check tunnel status
cloudflared tunnel info
Visit subdomain.example.com: your Coolify dashboard is now accessible from anywhere, over HTTPS, with no open ports.
Step 4 — Expose Your App on Its Own Subdomain
The tunnel currently points to Coolify (port 8000). To route traffic directly to your application (port 3000), add a dedicated route.
Via the Cloudflare dashboard
- Go to Networks > Tunnels.
- Click your tunnel → Routes → Add a route.
- Select Published Application.
- Fill in:
- Subdomain:
www - Service URL:
http://localhost:3000
- Subdomain:
- Click Add route.
Update in Coolify
- Open your project → Configuration > General.
- Update the Domains field:
www.example.com - Save and redeploy.
The Result
Your application — whether running on a recycled old laptop or a €5/month VPS — is now reachable from anywhere in the world at www.example.com, over HTTPS, with no open ports and no complex network configuration.
That’s the promise of Coolify + Cloudflare Tunnel: a complete self-hosting platform, accessible to everyone, regardless of your network setup.
Happy self-hosting!